| Method: |
  |
1.
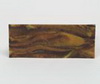
For making the wooden base:
Make about 40 ropes of 3mm diameter and 80mm long from brown, terra cotta and
yellow clay by Clay Gun Extruder. Then squeeze together as shown. Then roll
it into a 4mm thick sheet by roller. Cut out a 80mm x 30mm rectangle from it. |
 |
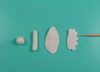
2.
For making the cupcakes and plates:
Roll into 2mm thick sheets from terra cotta, pink and white clay.
Cut out the shape by Cup Cake Clay Cutter (middle size). Cut the upper
tips out for the blue berry terra cotta) and strawberry (white) cupcake
by Mallet. Find two caps in 20mm & 13mm diameter. Roll a 2mm thick white
sheet and cut 3 circles in 20mm diameter as plates. Press a 13mm diameter
cap on top for making concentric circles. Leave them dry before use.
|
  |
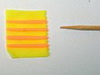
3.
Choose your favorite colors to make the cup cake paper.
For example: Roll yellow clay sheet into 1mm thick, approximate
30mm x 20mm rectangle by roller. Roll three 1mm diameter neon orange
ropes. Put on top of the yellow clay sheet, then flattened by the roller.
Cut a 30mm x 20mm rectangle sheet out. Use a toothpick to indent the edge
alternately as shown. Wrap the 3 cupcakes and seam well at the back.
|
 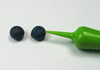 |
4.
For the blue berry cupcake:
For making the cream: Roll 8mm diameter white ball into rope. Then
flattened by roller. Use toothpick to indent the edge as shown. Then put
on top of the cup cake. Seam well. Making blue berry: Roll 8mm diameter
purple ball, slightly flatten it by finger. Drag a star using the Chisel as shown. Stick in place.
|
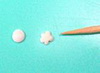 |
5.
For the stars frosting cupcake:
Roll a 2mm diameter white ball and flatten it with finger. Use toothpick to
indent the edge to make a star shape. Make 3 more stars in the same way. Roll
4 brown dots as well for the chocolate chunks and stick in place.
|
 |
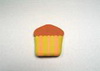
6.
For the strawberry cupcake:
Roll a 7mm diameter red ball into egg shape with finger. Indent on the larger
end then make tiny holes over it by toothpick. Cut a leave shape from a thin green
clay sheet by scissors as shown. Roll a short green rope as stem. Stick in place.
|
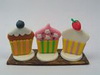 |
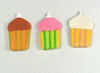
7.
Arrange as shown.
|
| |
| Designed
by - Dorothy Chan, MAKIN'S CLAY® Design
Team |

